Using a micropipette
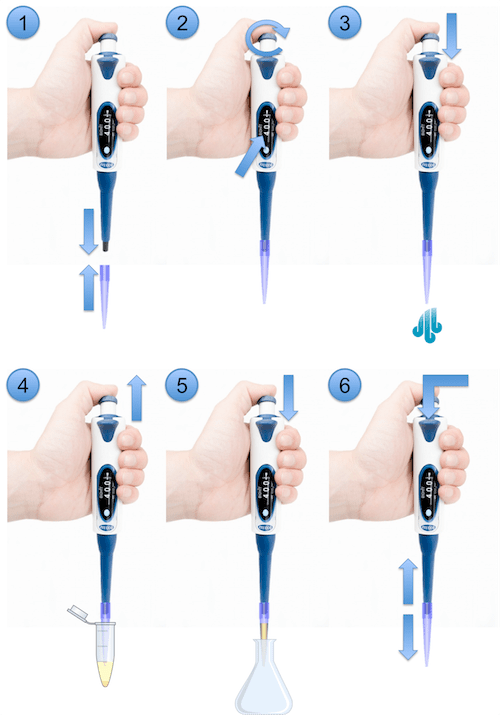
A micropipette is an instrument that measures volume with great accuracy. It is used with disposable micropipette tips, which are specific to the micropipette volume. Micropipette tips are usually bought in racks which can be placed in a box and used in a quick way. The mechanism of the micropipette is quite simple, as explained in the image below:

- The first thing to do is to fix the micropipette tip to the pipette by slight pressure of the tip holder onto the tip opening.
- Next, select the desired volume in the volume indicator (most micropipettes work with a rotation system located at the push button).
- Then, press the push button at the top of the micropipette, pushing air out (before dipping the tip in any liquid).
- Next, submerge the tip in the liquid that needs to be measured and aspirate until the micropipette push button is released at the top.
- Place the tip in the container where you want to add the liquid and press the button to release the liquid (not too fast or it might splash). If you are adding the liquid to a different solution and not an empty container, press and release the micropipette inside the liquid several times to mix. When releasing the liquid, always press the micropipette push button to the end.
- Micropipette tips should be used just once as samples get contaminated (mixed) with whatever liquid you used previously with the same tip. To eject them, press the tip ejector which is usually located at the front of the micropipette. They are disposed in small tip containers that are usually available on the lab bench.
There are several micropipette types according to the volume they can handle. The most common are: 1000μL, 200μL, 100μL and 10μL. You should always try to use the micropipette that has the closest maximum volume to the volume you want to take. For example, if you need to take 100μL, use the 100<μL micropipette, not the 1000μL.
Pay attention to the minimum volume that can be measured accurately, it is usually mentioned on the micropipette itself. When using micropipettes under sterile conditions, they are usually already inside the hood. They are regularly sterilized in an autoclave, dried, sprayed with ethanol and replaced in the hood. In order to avoid cross-contamination of samples, it is best to use micropipette tips with filters, which will stop any liquid from going inside the micropipette system, even if there is a sudden surge in pressure. Pressure surges can occur when the micropipette is not functioning well, when the tip is not tightly attached to the micropipette or when you release the push button too fast.
Using sterile plastic pipettes
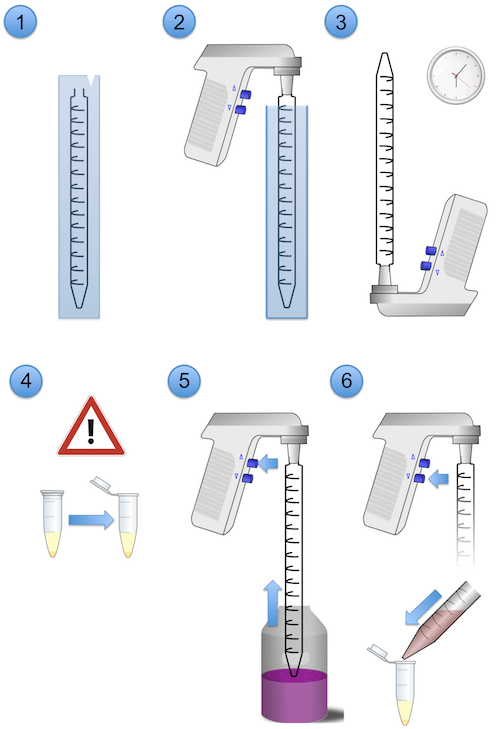
Always use a new pipette when changing either the cell line to manipulate or the liquid source to pour. If you’re adding the same liquid over the same cell line a number of times, make sure you never touch the liquid that’s already with the cells. If you’re not sure, discard the pipette and use a new one every time. The way to open a pipette is as follows:

- Prepare the gun on the side. Break the protective plastic on the side that goes into the pipette, but don’t remove it completely.
- Plug that end into the pipette and remove the plastic.
- You can leave the pipette inserted into the pipette gun and leave the gun standing on the hood surface before it contains any liquid. Never do it when the pipette has been used as the liquid can get into the pipette gun and produce contamination (even if the pipettes have filters).
- Get your wells/liquids ready by opening any caps if you hadn’t yet.
- Remove the plastic and be careful not to touch anything else with the pipette tip. Put the pipette in the liquid you want to take (medium for example), and press the upper button of the pump to suction the liquid up.
- Move the pipette tip to the flask where you want the liquid in and press the lower button to release the liquid. You can now remove and discard the pipette.

Comments